Emailing SharePoint Group with O365 Flow (Power Automate)

Task

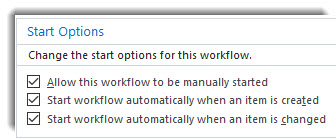
I came across this issue when changing from SharePoint Designer to O365 Flow (Power Automate). In SP Designer to email a SP group its easy, just select the group and it emails them. With Flow you don’t have that option, so you have to do a HTTP Get from SharePoint. This also does not require any premium actions.

Solution

Here is the overall outlook of the Flow:Capture

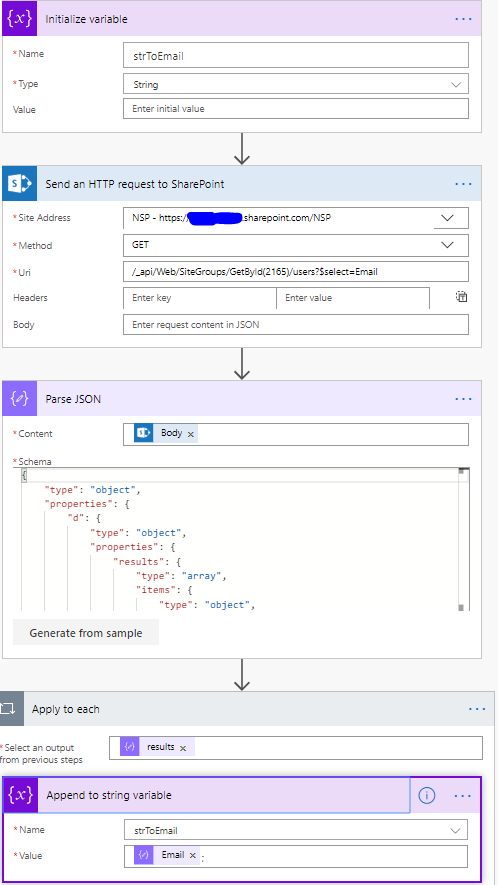
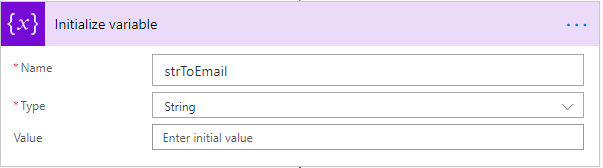
  • Initialize a string variable, this will contain all of the users emails within the provided SharePoint group.

Capture3

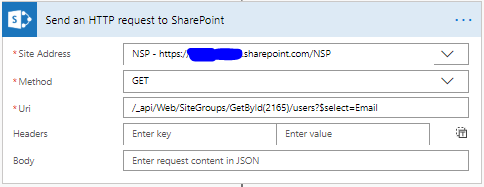
  • Add a Send an HTTP request to SharePoint
    • Site Address: You should be able to select it from the pull down
    • Method: GET
    • Uri: /_api/Web/SiteGroups/GetById(2165)/users?$select=Email
      • The Id number you can get by going to the group itself within SharePoint, it will be in the URL: /_layouts/15/people.aspx?MembershipGroupId=2165

Capture4

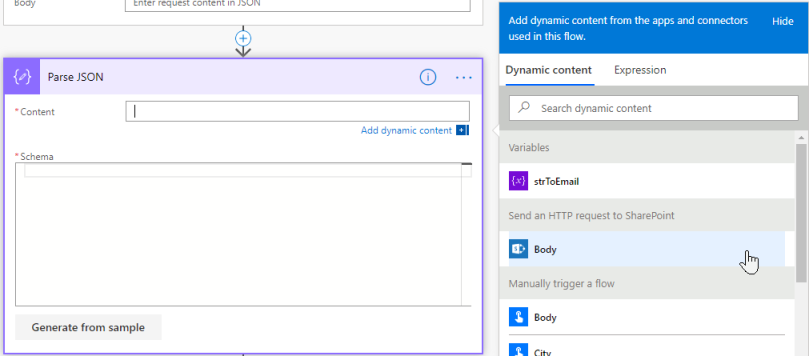
  • Add a Parse JSON action

2020-02-29 18_55_21-Edit your flow _ Power Automate

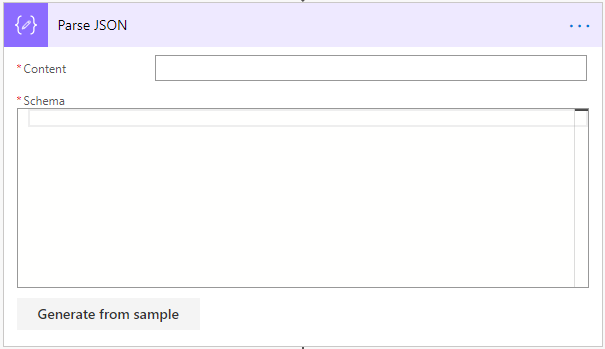
  • For the Content select Body from the Send an HTTP request from SharePoint

2020-02-29 18_55_55-Edit your flow _ Power Automate

  • Next for the Schema click Generate from sample then paste the below into the result and click Done
    • {
          "d": {
            "results": [
              {               
                "Email": "MyEmail@gmail.com"
              }
            ]
          }
      }

2020-02-29 18_56_41-Edit your flow _ Power Automate

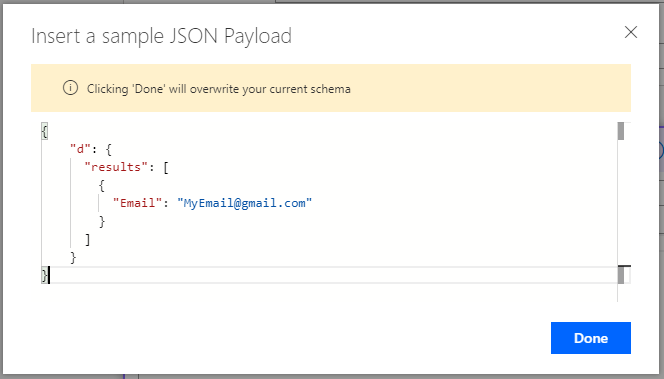
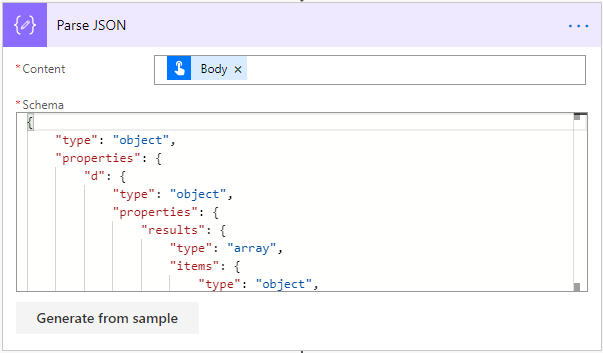
  • it will then automatically populate the Schema as shown below

2020-02-29 18_59_46-Edit your flow _ Power Automate

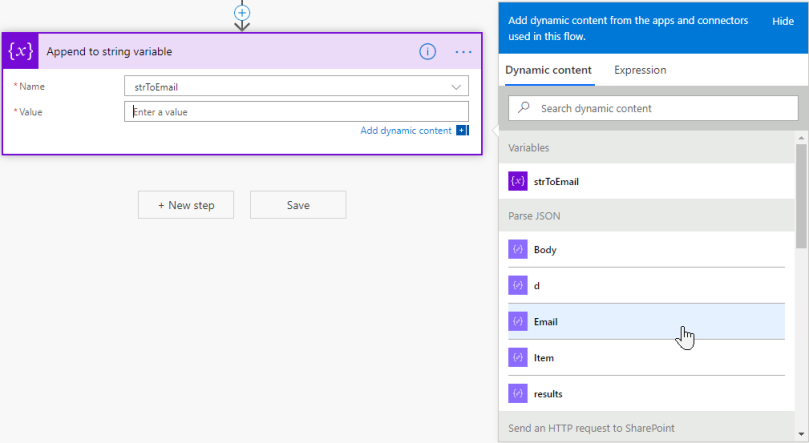
  • Lastly add the Append to string variable
    • Name: Select the initial string variable from the beginning
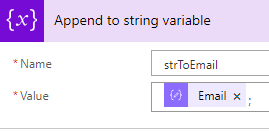
    • Value: Set the value to the Parse JSON – Email and it is IMPORTANT to add a semicolon after the Email
      • NOTE: it will then automatically be wrapped by an Apply to each

2020-02-29 19_05_24-Edit your flow _ Power Automate

Semicolon Added!

2020-02-29 19_09_30-Edit your flow _ Power Automate

Done!

SharePoint: Create Default Permission Groups

 Error
Members cannot share this site because this site is missing a default members group.

2020-02-29 22_30_39-sharepoint online - Access Request Settings is raising the following error _Memb

Resolution
What we need to do is either create the default groups or assign existing groups as the defaults.

 Instructions
Navigate to the site and then modify the URL tot he below
https://yoursite.sharepoint.com/permtest/_layouts/15/permsetup.aspx
All you need to do is add the _layouts/15/permsetup.aspx at the end of the site/sub-site URL.


This will bring up this screen: Either Create a new group or Use an existing group and click OK

2020-02-29 22_32_58-Set Up Groups for this Site

All Done!

SharePoint: Cannot share site…

Task

Sometimes you come across the error “Members cannot share this site because this site is missing a default members group.” This error is caused by you missing your default groups for usually your sub-site.

Solution

Information
Basically we need to re-add the default groups to a site when it has its own unique permissions in comparison to your parent site. It can happen when/if you after creation detach the sub-site from the parent permissions.

Error
3-12-2019 10-16-22 AM

Group Creation
Depending on your version and how the site was create the URL can be different.
Here’s your options:
https://sharepoint.com/subsite/_layouts/15/permsetup.aspx
https://sharepoint.com/sites/subsite/_layouts/15/permsetup.aspx

sharepoint.com: This is your SharePoint site depending on what SharePoint setup you have
subsite: This is your sub-site that you are working with.

This will bring up a site allowing you to set up custom groups or use existing ones to be the default Visitors/Members/Owners for the site.

3-12-2019 10-43-16 AM

Once these are set then you can then head back to the permissions and it will no longer receive the error. =)

Done!

Clear Chrome Passwords

Task

Clear passwords stored within Chrome. This is for build “Version 72.0.3626.121 (Official Build) (64-bit)” which is the current at this time.

Solution

Menu
Navigate to the top right and click the Ellipsis > More Tools > Clear Browsing Data…
An alternative is you cal press the shortcut of Ctrl+Shift+Del.
3-1-2019 4-29-04 PM

Options
Here you can select additional things to clear and how far back to go.
3-1-2019 4-33-16 PM

Click Clear data.

SharePoint Pre-Save Validation

Task

To perform validation on the fields you are attempting to save before you actually commit the line item. This is checking the values of the fields you are currently typing/selecting to input.

Solution

We are going to do a basic validation but you can get as complex as you like.

List Settings
Navigate to your list settings then under General Settings Click on Validation settings.3-1-2019 3-54-19 PM

Formula
Next you need to fill in the formula, as most formulas within SharePoint, they function just like Excel formulas.
In this one I want the field Mission Units to be less than or equal to Number of Units.

How I plan to do this is using the formula below:

Formula: =IF([Mission Units]>[Number of Units],FALSE,TRUE)
Error Message: Mission Units cannot exceed Number of Units

3-1-2019 3-58-58 PM

Multiple Validation
You can perform multiple checks by incorporating multiple IF’s, so lets say we want to make sure the number is more than my Minimum Units column as well.

This is the formula and error message I would use:

Formula:=IF([Mission Units]>[Number of Units],FALSE,IF([Mission Units]<[Minimum Units],FALSE,TRUE))
Error Message: Mission Units must be between Minimum units & Number of Units

More Functions
For a complete list of functions see Microsoft Office’s Support site:
https://support.office.com/client/examples-of-common-formulas-in-sharepoint-lists-d81f5f21-2b4e-45ce-b170-bf7ebf6988b3

PowerApps Clear Text Input

Task

Clear the Text Input field within a PowerApp.

Solution

Below are the below properties we are going to be editing with a description of what they each are.

Text Input
Default: The default value of the field, it accepts either a Text or Number value depending on its Format, which is another property with a pull down.
Reset: This property take a Boolean (true/false) value, it will “reset” the information displayed within the Text Input to its Default when set to True.

Screen
OnVisible: This runs when the screen launches.

Button
OnSelect: This runs when the button is selected/pressed.

Here is the TestScreen that we are working with today.
10-16-2018 3-31-37 PM

Setting the TextInput Properties

This will allow it to reset once the variable is set to true, setting the input back to whatever you have the Default set too.

  1. Select the TextInput
  2. Select Advanced
  3. Under DATA there is Default and Reset
    10-17-2018 8-11-28 AM
    Default: Set this to what you would like it to reset too, if you would like it to clear set it to “”.
    Reset: Set this to a Boolean (true/false) variable, I am using resetText.

Setting the Screen Properties

This flips the variable back and forth when the screen loads so that the field will always be cleared on load.

  1. Select the Screen, I am using TestScreen.
  2. Select the OnVisible Property
  3. Add below to the Property.
    10-17-2018 8-41-24 AM

    UpdateContext({resetText: true});
    UpdateContext({resetText: false})

Additional Uses

With the above code you can apply it also to a Clear Button as shown above. I personally also apply it to things like the back or cancel button to ensure it is cleared out before even leaving the screen. To do this just copy and paste the code into the OnSelect of the button or object you would like to perform this function.

SharePoint: Email Format Validation

Task

Validate the entry to a field requesting an email. This is using the Column Validation option within the creation of a column on a list.

Solution

Basically what we are doing is just ensuring that an “@” symbol and the “.” are within the email that they are attempting to submit. You will need a list and either create or edit a column as below:

Requirement: There are 2 different formulas based on whether the column is required or not, so pick the correct one below.
Required Field Formula:
=AND(ISERROR(FIND(" ",EMAILTOBECHECKED,1)),IF(ISERROR(FIND("@",EMAILTOBECHECKED,2)),FALSE,AND(ISERROR(FIND("@",EMAILTOBECHECKED,FIND("@",EMAILTOBECHECKED,2)+1)),IF(ISERROR(FIND(".",EMAILTOBECHECKED,FIND("@",EMAILTOBECHECKED,2)+2)),FALSE,FIND(".",EMAILTOBECHECKED,FIND("@",EMAILTOBECHECKED,2)+2)
Optional Field Formula:
=IF(LEN(EMAILTOBECHECKED)<=0,TRUE,AND(ISERROR(FIND(" ",EMAILTOBECHECKED,1)),IF(ISERROR(FIND("@",EMAILTOBECHECKED,2)),FALSE,AND(ISERROR(FIND("@",EMAILTOBECHECKED,FIND("@",EMAILTOBECHECKED,2)+1)),IF(ISERROR(FIND(".",EMAILTOBECHECKED,FIND("@",EMAILTOBECHECKED,2)+2)),FALSE,FIND(".",EMAILTOBECHECKED,FIND("@",EMAILTOBECHECKED,2)+2)
User Message: This can be any message you want the user to see when the above code returns false meaning it is not a valid email. I use something simple like “Please enter a valid Email address
3-8-2019 7-03-17 AM

SharePoint Web Parts Not Moving?!?!

Task

Sometimes when attempting to move web-parts within SharePoint they will just not move. There is a very simple solution to this issue using the web-part properties.
NOTE: This works on Web Part pages, not on Wiki Pages.

Solution

Edit Web-Part
Edit the Page, click on the arrow in the top right of the web-part and click Edit Web Part.

The two areas we are going to look at are under the Layout section:
Zone: This allows you to transfer the Web Part to a different Web Part Zone.
Zone Index: This is the ordering of the Web Parts in the Zone

3-4-2019 10-28-49 AM

So to move the Web Part, just modify these values and the Web Part will adjust its location without attempting to use the Drag & Drop feature that rarely works properly.

SharePoint Hyperlink in Workflow

Task

To use a workflow to populate a Hyperlink field with a URL and Display Text to click on. This is using a 2013 workflow on SharePoint Online.

Solution

SharePoint Designer
From within SharePoint Designer:

Create a variable and name it

Set the Value
When setting the value click the ellipsis “…” to use the string builder.
We are going to make a simple link to Google, but you can make it as complex as you like.

https://www.google.com/, Google

3-4-2019 9-46-24 AM

The Important part here is the comma, that tells it to set the link to the URL on the left of the comma and the display text to be the text to the right of the comma.

Update Item
Now add the Update item step:
3-4-2019 9-54-34 AM

Now set the Hyperlink in the list by clicking the this list link:

  1. Click Add…
  2. Set the column with the hyperlink, in this list its called Hyperlink Test.
  3. Click the ƒx button.
  4. Set the Data source: to Workflow Variables and Parameters.
  5. Set the Field from source: to the variable you just made, TheLink in this example.
  6. Click OK.
  7. Click OK.
  8. Click OK.

3-4-2019 9-52-08 AM

Now we will end the Workflow:

3-4-2019 10-06-01 AM

Time to test:
NOTE: I have this workflow run when an item is created/modified/manually.

3-4-2019 10-07-35 AM

Worked Perfectly!
3-4-2019 10-09-31 AM

Done!